Those that know me, know that I like things that, on a scale of one to ten, go to eleven. For the youngsters out there, see Spinal Tap, 1984. But is there such a thing as turning it up too high? I receive, and answer, a lot of questions about measuring with a time domain reflectometer (TDR).
How much bandwidth do I need?
How fast should the edge be?
How to I connect it to the DUT?
It pains me to say this, but there is such a thing as turning the TDR up too high and it is also easy not to have enough. I addressed this briefly in my book, Power Integrity. If there is a “too high,” and a “not high enough,” there must also be a “just-right,” or Goldilocks, setting. Using measurements, and a smattering of math, the Goldilocks setting answers will be clear. In the words of the infinitely wise Eric Bogatin, “it depends” will define these settings, which will change on a case-by-case basis.
Too Much TDR
Bandwidth is expensive, so too much TDR is one that costs a lot more than necessary for the measurement you want to make. If you didn’t care about the extra cost, would too much TDR still be a bad thing? In a word, yes. The image in Figure 1 shows the measured TDR response for a short PCB trace and connector. The top trace is measured using a 22.3ps rise time (roughly 16GHz) TDR signal while the second trace shows the same short PCB trace and connector using a 150ps rise time (roughly 2.3GHz) TDR signal.
The faster TDR signal creates a lot of unnecessary ringing, due to the low-quality connector, but the ringing also obscures the actual trace impedance. More bandwidth, at a higher cost, doesn’t produce a better result. Having said that, a higher cost TDR might offer the selectability of the rise time, as the instrument used here does.

Figure 1 The same low quality connector and short PCB trace is measured using a 22.3ps rise time TDR signal(top trace) and a 150ps rise time TDR signal (lower trace).
Too Little TDR
Insufficient bandwidth misses specific artifacts that could be important. The screenshot shown in Figure 2 shows the same PCB trace measured with a 500MHz TDR bandwidth and a 6GHz TDR bandwidth. At 6GHz, the edge connector is evident, as well as two other discontinuities. At 500MHz there are no discernable discontinuities at all.

Figure 2 The same PCB shows the connector discontinuity and two additional discontinuities. At 500MHz none of these discontinuities are evident.
The Just Right (Goldilocks) TDR
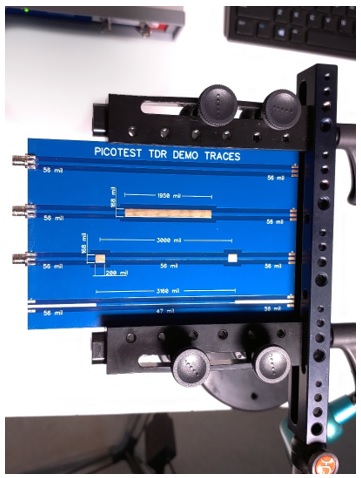
SMA edge connectors were attached to three traces on a TDR Demo board, shown in Figure 3. These three traces are used, as case studies, to validate the Goldilocks solution.

The TDR signal travels at the speed of light, C, in a vacuum.

Or in inches per second per second

In a medium, such as a cable or a printed circuit board, the signal is slowed down by the dielectric constant of the medium. Cable manufacturers usually specify this slowing as the velocity factor (VF) of the cable. The velocity factor is related to the dielectric constant of the cable, Dk, by the relationship

The spatial resolution, of the TDR is half the rise/fall time

Setting the spatial resolution equal to the distance travelled results in

And converting to inches

Relating these to bandwidth, rather than fall time

And converting to inches

The third trace from the top on the demo board, shown in Figure 3, includes a pair of copper rectangles, 200 mils wide and 168 mils tall. The 168mil is wider than the 50 Ohm trace, so an impedance dip is expected at each location. (The PCB is FR4 and a Dk of 4 is assumed.)
Setting the spatial resolution to the 200mil width of the rectangle and solving for the fall time and bandwidth results in 5.2GHz and 68ps respectively.
The demo board is connected to the TDR, as shown in Figure 4 and measured with the oscilloscope bandwidth set to 4GHz, 5GHz, 6GHz, 7GHz, and 8GHz. Each of the measurements is saved as a reference trace and the impedance minima is measured using the oscilloscope measurement function.

Figure 4 The demo board is connected to the TDR using a short rigid coax. The oscilloscope is set to capture the discontinuity at 4GHz, 5, GHz, 6GHz, 7GHz and 8GHz. The minimum impedance is also captured for each trace using a measurement function.
The resulting screenshot is shown in Figure 5.

Figure 5 The discontinuity measured minimum impedance from 4GHz to 8GHz in 1GHz increments.
The TDR is 10.5GHz (33ps), and this is combined with the rise time of the scope for each bandwidth


The impedance minima are compared to the 8GHz measurement for each of the other measurement bandwidths:
Table 1 Measured minimum impedance vs measurement bandwidth
|
Bandwidth |
Minima |
% Error |
BWmeasure |
|
8 |
26.75 |
NA |
6.9 |
|
7 |
27.26 |
1.9% |
5.9 |
|
6 |
28.24 |
5.6% |
5.3 |
|
5 |
29.39 |
9.9% |
4.5 |
|
4 |
31.45 |
17.6% |
3.8 |
At the Goldilocks bandwidth, determined for the 200mil discontinuity, the impedance minima are within 5% of the 8GHz measurement, validating the mathematical solution.
PCB Coupon
We can also determine the bandwidth needed to measure a cable or PCB coupon using this spatial resolution. Trace 1 of the demo board is a 6-inch-long 50 Ohm trace. Setting the resolution to 6 inches, again using a dielectric constant of 4, results in

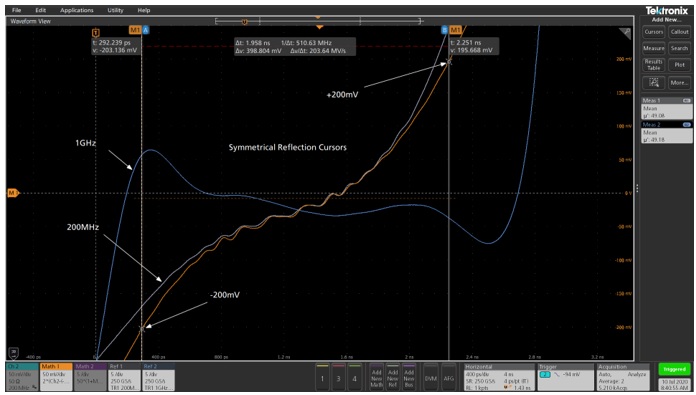
And solving for bandwidth results in a minimum bandwidth of 172MHz to measure the average impedance of a 6-inch trace. The measurement is shown using a bandwidth of 200MHz and a bandwidth of 1GHz in Figure 6.

Figure 6 A 6-inch long, 50 Ohm trace, is shown using a 200MHz bandwidth and a 1GHz bandwidth. Both lack clear detail, but using a trick allows accurate measurement.
The 1GHz measurement shows the Gibbs phenomenon, due to low bandwidth, and the 200MHz bandwidth lacks a clear flat region to measure the impedance. A simple trick can be employed to accurately measure the impedance even with these uncertainties. The TDR provides the reflection coefficient, which is used to compute the impedance. Setting cursors on the reflection measurement in a symmetrical fashion provides the averaging interval. In this example, the reflection coefficient is shown in the orange trace and the cursors are set at -200mV on the left side and +200mV on the right side. The oscilloscope measurement function is used to display the mean for each of the impedance traces. The measurements use a cursor gating function to evaluate the mean only between the cursors. The two impedance measurement results are within 0.2% of each other.
Increasing the bandwidth to 8GHz does provide much finer detail. The screenshot in Figure 7 shows the measurement averaged over the second two-thirds of the trace length. This measurement indicates 47.3 Ohms, confirming that the result at 200MHz was within 5% accuracy. At 8GHz, the SMA edge connector is also clearly seen on the left side of the image.

Figure 7 At 8GHz the SMA edge connector is clearly visible, and the trace provides a nice, flat region to measure over. The mean is averaged between the cursors, placed over approximately the latter two thirds of the trace.
PDN Cable
This methodology also applies to cable. A 1-meter long PDN Cable is connected to the TDR as shown in Figure 9. The oscilloscope shows the measurement at a number of frequencies, but we’ll focus on two of them.

Figure 8 1-meter PDN Cable connected to the TDR. The scope screen shows the measurement at many frequencies; we’ll choose just two.
The cable, measured at 8GHz, results in the screenshot shown in Figure 9. Cursors are placed at the connector launch on the left side and the end of the cable on the right side. The cursor display shows that the flight time of the cable is 9.513 ns and this time represents 1 meter or 39.37 inches.

Figure 9 The cable measurement at 8GHz shows a signal flight time, measured using cursors, from the connector launch on the left, to the end of the cable on the right, of 9.513ns. This time represents 1 meter or 39.37 inches.
Measuring the cable again, using a bandwidth of 200MHz results in the measurement shown in Figure 10.

Figure 10 The cable measurement at 200MHz shows a signal flight time, measured using cursors, from the impedance -1Ohm to the impedance + 1Ohm, of 5.857ns.
The horizontal time scale hasn’t changed between Figure 9 and Figure 10, but the cursors are moved 1.857ns in from each end, resulting in this apparent shorter length.
Using the 9.513 ns flight time of the cable, the delay can be computed as an effective length

Calculating the spatial resolution of the cable, using the velocity favor of 0.7 and the measurement bandwidth of 200MHz results in

The spatial resolution and the delay are within 5% of each other, again confirming the solution. Using this relationship, the actual length of the cable can be calculated using the spatial resolution at the beginning and end of the trace

Which is within 2% of the correct cable length.
Conclusion
Using the special resolution, we optimized the performance of the TDR and mathematically defined the limits. So, what is the Goldilocks frequency?
-
Ideally, use the TDR at the bandwidth of typical operation. Bandwidth is expensive
-
The minimum TDR bandwidth required to obtain an accurate impedance measurement is

Even at low bandwidth, special resolution can be used to correct the actual trace length
- Limit the bandwidth to a maximum of twice the operating bandwidth
- Keep in mind that the bandwidth is the measurement bandwidth, which includes the bandwidth of the probe and/or interconnecting cables and connectors


